Webopac Preferences – Profile Reading lists
1. Introduction
Reading Lists are temporary "containers" that hold references to documents. These can be documents in the local bibliographic database(s) or URL's.
Reading Lists can be linked to one or more Reading Lounges, but they can also exist on their own, i.e. not linked to a Reading Lounge (these are also accessible through the "User Activities" and several menus).
The documents that are stored in a Reading List have the following properties:
·
They have a specific comment.
·
They have a specific "reading advice".
Note that this comment and this reading advice are not identical to the values that are stored in the general Rate & Review feature. Note also that it is, of course, possible to store "regular" Rate & Review data for these documents. The comments and reading advice that are added in the Reading List are specific to the Reading List (e.g. the same document can have the reading advice "Background reading" in Reading List A and the reading advice "Essential reading" in Reading List B). The comments and reading advice are not displayed in the general WebOpac, but only in the context of the Reading List.
They can both be updated from the Reading List display.
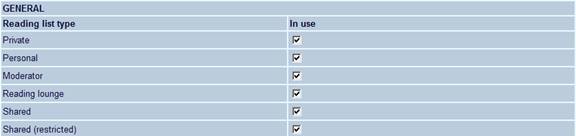
Reading Lists can be of the following types:
· Private: only the creator had read/write access to the list
· Personal: the creator has read/write access, others have read access
· Reading lounge: reading lounge list, only members have read/write access
· Moderator: only lounge moderators have write access
· Shared: everyone has read/write access to the list
· Shared restricted: everyone has read/write access to the list but a user can only delete items that (s)he has added personally
The Reading Lists overview screen
This screen displays a list of all the Reading Lists for a specific user (however, if the user has not logged on, only shared Reading Lists will be displayed).
If the user is logged on, (s)he can:
· create a new Reading List
· create a new URL that can be added afterwards to one or more Reading Lists
If a Reading List is selected, the Reading List details screen is shown.
The Reading Lists details screen
The Reading Lists details screen is very similar to a "normal" save list display in the WebOpac, but it has additional columns for URL, comment and rating.
Comment and rating can be updated if the user has write access for the Reading List.
Adding records to a Reading List
Database records can be added by selecting items and using the "Save selected items" option.
The record list screen has an additional dropdown list at the top in which the available reading lists are stored. The current entry is the "active reading list" in which documents are stored when the "Save selected items" option is activated. If no reading list is active (option "-"), then the user is taken to the reading lists overview screen and can then add the documents to one or more reading lists.
URL records can also be created and added to a reading list. This is done from the reading lists overview screen.
2. Setup
A certain amount of setup is required in the Vubis client.
· A new database for the Reading Lists must be created in AFO 151 – this database must use a format without authorities for the fields that are used in the cataloguing template (else borrowers would be able to create new authorities). The format should be a subset of the main format – that way the same fields and subfields can be used for the templates.
· Make sure that the main format is set as identical format for the new format (use the option in the toolbar on the main formats page) – in fact this does not mean the format is really "identical", but rather "compatible".
Important note
If no authority-controlled fields are used for the template, then there is no need to create a new format – the standard format can be used in that case.
· An import profile for new Reading List records must be created in AFO 133 – the input database must be the newly created Reading Lists database – the format information of the profile is not relevant in this case.
· A cataloguing template must be created for the addition of URL's – typically this template will have at least fields for Title and Resource location. Indicators will not be available in the reading lists data entry form. Automatically added fields like record leader or fixed fields can be stripped from the template before it is saved.
3. WebOpac Preferences
Go into the WebOpac preferences, page "Templates", and add "Resource location" (the subfield that contains the URL link), as a new selectable field if it has not yet been added; then select the field order for the reading lists, and make sure that "Resource location" as well as the special fields "Comment" and "Rating" are included.
There are Reading Lists options on to the "User Activities" page ("Main Menu" section). Also buttons for Reading Lounges are available on the "Menus" page so you can add them to the menus that you consider appropriate.
Reading Lists also have their own preferences page that must be set up per profile. You set up the database, import profile and template to be used, as well as the reading list types and reading lists column layout.
Note
Reading Lounges have their own set of Preferences, that must be set separately.
3.1 Reading Lists page
You can define options for each profile and for each language.
· Select the language for the profile from the drop-down menu
· Select the profile for which you want to make the changes

Languages are defined on the Start page.
In the first section you can define which options will be available:
In the next section you determine the column headings on the overview screen:
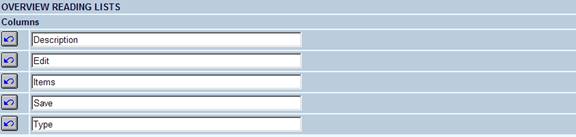
The option "Names above columns in record lists" allows you to define the wording of the column headings that appear above list displays:

· Use the Width box to determine how much space is allocated to each column.
The actual data that is displayed is determined by what is defined in Templates – Elements.
You can change the order in which the columns display, and add new columns too by clicking the button.
· Make sure you change the Width fields to take account of the new heading.
·
Use the right arrow key ![]() to move the new column heading from Available options to Chosen options
to move the new column heading from Available options to Chosen options
·
Use the up and down arrow keys ![]() to determine in what order the headings display.
to determine in what order the headings display.
The “Names above columns in record lists” has a property “Sort index”. This property allows you to define if a column header must be clickable to sort the list and if so, what the sorting index should be. Under default sorting you can determine how the initial display of the list will be sorted.
Note
Even if you do not want the headers being displayed, you have to define headers, because the NUMBER of headers determine the number of columns to be displayed
In case you use the alternative display you have of course no columns headings which to click for sorting. For this option you can set alternative sorting parameters:
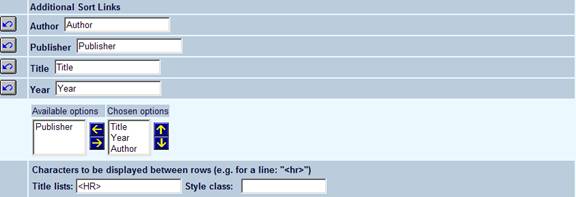
· Characters to be displayed between rows; this creates the ability to separate records (“rows”) with e.g. a line (HTML <HR>) or a blank row (HTML <BR>).
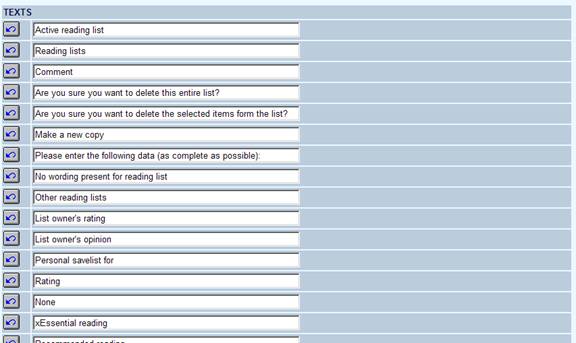
You can also define various texts for this feature:
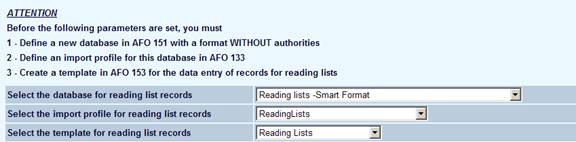
Finally you have to set database, import profile and template (as defined in the client interface):
Note
Always remember to click the button to save any changes you have made.
